Thursday, May 26, 2016

How to reupholster attached couch cushions:


It's been a very long time since I've posted any projects, but here we go.
We have a leather couch that was peeling and becoming very messy and ugly.  
We didn't have the extra money to purchase another one and so I reupholster it.
 
To be honest, I was scared to death to start the project cause
I really didn't know what I was getting myself into. I recovered the bottom cushions a few years back, and because the back attached covers were still in good shape I left them alone.
 
 I stared at the couch for days trying to figure out what to do. Then I figured, what do I have to lose - I started cutting and then got a better idea on how I would create a new cover.  I used about a yard of fabric per attached cushion and kept the existing zipper from the old cover.
 
I'd love to hear all about your projects too.
 
Click on the link below to see the video on how I recovered the cushions, hope it helps.


Saturday, February 4, 2012

DIY Gumball Machine

Out of everything I've made . . . this HAS to be one of my favorites!!!!!!

All you need:

  • ceramic pot 
  • the bottom plate of the pot
  • glass bowl
  • wooden ball for the handle
  • paint
  • e6000 glue
  • vinyl

To determined the size that I wanted, I started with the glass bowl.  I put all the pieces together and then decided if I like it or not. I got the bowl at hobby lobby, 
but couldn't find the right size pot and lid there. I got the pot and lid at Michael's 
(one word of advice, bring the bowl when shopping to make sure everything works together)

Because this was a valentine project, I chose red and white paint.  
(I used two coats of paint)

Once the paint was dry . . . the fun begins.

place glue on the pot and place glass bowl on and leave it over night to dry.
Do the same for the wooden handle. 
 Place glue on the wooden ball and place it in the center of the lid


"Sweet Treats" is vinyl and cut out with my cricut.  
Same method that I did "XOXO"
The only tricky thing is that placing the entire thing on straight. All the letters are connected to make one large sticker.  Now most people who are smart have transfer paper, but of course that would be too easy.
Anyway, after SEVERAL tries and scrapped paint - I finally got it!
Add your favorite candy and you're done.  SOOOOOO fun and cheap to make.

Don't you love it!!!!!!!!


A girl and her power tools

I LOVE, LOVE power tools.

When looking for a specific Valentine decor, I couldn't find the right one, soooooo I said "well, I'll just have pull out my tools and make it myself"
 hehe . . . this is where I get excited!

Supplies:
  • wood
  • paint
  • sander
  • scroll saw
  • drill
  • cricut
  • adhesive vinyl (because the small amount of vinyl I was using . . . I didn't want to spend $9, so I called up a sign company and got a 8.5x11 piece for $1)


I ask a friend (who builds) if he had extra wood - got this great piece of solid pine. I cut "Love" using my cricut on thick paper and traced it on the wood.

I didn't get a picture of my scroll saw, cause my batteries in my camera
 were dead and I was running out of time, ha! 

Anyways, I cut out the word using my scroll saw.
First cut around the outside and the trick to cutting inside of the
 "e" and the "heart" is use a drill to make a hole in the
 center of the "e" and the "heart"
Sorry again, I don't have pictures.
You then remove you blade from the saw, place the wood in place and 
put blade back into it's slot then start cutting.  It can get a little tricky, but as long of 
you guide your wood and follow the line, you'll be fine.


 The block are 3x3 squares. I had a friend cut those with a chop saw, I wasn't brave enough to try it, ha!
That's next on my list for try, though.

I sanded each piece of wood with my handy little sander.

 Ok, so I painted everything red, but I wasn't sure if I like it so I sanded the "Love" and then couldn't decide what I liked better - I ended liking it all red
 (but forgot to take a final picture - sorry)

I love the "XOXO" All I did here, was cut out the letter with my cricut.  
Now when you cut on a vinyl sheet, I set my cricut pressure on med
 so that it didn't cut through entire sheet, then you just peel it off like a sticker.
Now you're ready to put it on the wood - just watch for air bubbles.


~ Thanks for stopping by ~

Valentine easy crafts


The Love Frame:

Supplies:
  • Frame (whatever size you desire)
  • paper, I bought a 12x12 sheet of red glitter
  • black paper
  • white paper
  • cricut
This was probably the easiest project ever. I just cut out a heart and the word "love", layered it where i wanted it, taped it down and placed it in the frame.  Not to expensive either.  The frame was on sale at Michael's . . . I love those sales :)


Paper Mache Box:

Supplies:
  • Paper mache box
  • paint
  • black paper
  • cricut
  • mod podge
Another extremely easy project - fun for kids too. 

I painted the bottom of the box red & the lid white, 
then I design and cut out swirls
 for the top to match my theme.  
I used mod podge to make the design stick - love that stuff!!!!
This project only cost me $1, cause I had everything else.  
It's a simple box, but when you add it to the rest of your decor, it's the perfect accent ;)  


Friday, February 3, 2012

Love is in the air

Love is in the air


So excited about this new project . . . I have been asked to decorate an office for Valentine and these are the items I had to make on my own.
When I first got the job, I went out looking for item and to my surprise it was very difficult to find non-cheesy valentine decor.  In one day, I went to 9 stores in the matter of 45mins, driving all across the city - going into store I normally don't go into.  
ANYWHO . . . . I then decided to make everything on my own and I'm going to share it you ;)

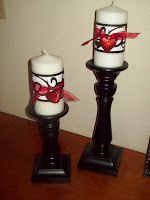
Candles:

  • 2 candles
  • black paper
  • SCAL (my software for my Cricut)
  • Cricut
  • ribbon
  • heart charm
  • candle holders (from Hobby Lobby)
Created my own border using SCAL, I cut out a white strip to glue the border. My first idea was put the black border directly on the candle, but the glue stick I have didn't work that great . . . I'm sure there's another way, but I figured that white paper will work good too.
 lay the black border down and start on one side with two way glue stick 
(or whatever adhesive you have)
layering the white strip on top

The finished border - wrap around the candle, meet the end together 
and use a strong adhesive to hold it closed

add ribbon, tie a heart charm, put them on the candle holders and 
viola your done!!!  So easy and fun!

Stay tuned for tutorial of the other project coming soon.

Thanks for stopping by

Thursday, February 2, 2012

Be Consistent ~

Growing up, my mom drilled into us that parents need to be consistent. Helping her with our foster kids really drove it home and it still rings in my ear.  I do fall short many times, but I got a gentle reminder the other day . . 

I picked Christopher (5) up from school and headed to Walmart . . . on the way home, he was VERY quiet, so I asked him "Christopher what are you doing?" 
Christopher "I'm drawing on my clothes"
Mommy "please, don't do that - we don't write on our clothes"

I left it along and made a phone call - using my ear piece :) 
Once I got off the phone, he was just as quiet, i asked him again . . . 
"what are you doing?"

This time he said he was writing on the seat (we have leather seats)  
By this time, I got a little irritated, cause this is NOT the first time he's done this nor is it the first time that he's been told . . . you know you kids, they don't always receive instructions the 1st, 2nd, or even the 3rd time. 
So I said, very calmly, "Ok, because you didn't listen, you can't watch your shows when we get home"

Well . . . . that set off the tears and whining and more drama AND the lying

Christopher "I didn't do anything, I didn't write on the seat . . .
 I didn't, I didn't . . . etc" *sobs*

BUT because I actually saw the writing and restated what he said to me, 
I caught him in the lie.

My next responds was again very calm :)
 "Ok, so now that you're lying to mommy, no shows tomorrow either and if you continue, you won't get to watch you show later this week"

well, I think he got it cause he stopped the drama and pouted.  By this time, we were home and I gave him his lunch. Normally I let him watch a movie while he eat, so this time it really set in cause he was just sitting there with no shows

But this is what got me . . . . 

Christopher while sitting eating he said to me "Mom, how come when I lied last time you let me watch my shows (his words exactly)"

It stopped me in my tracks and I mumbled something to him, but inside I was torn up.  I haven't been following through with my words . . . 
I'm famous for "if you don't stop right, I'll . . . " but often times never follow through.
 Empty threats!!!!  Our kids see right through it and continue testing

I think that as parents we think that JUST telling our kids 
but don't follow with action that they'll get it,
 but from what I'm seeing . . . that's not working, ha!
When children disobey, lie, disrespect, etc . . . there has to consequences that get their attention.  
Find out what works to get their attention . . . 
I'm not talking about beatings. . . . 
I'm talking about taking thing away that they really like, time outs, ect.  

For Christopher, watching his "shows" is really fun and enjoyable. 
Now he had two days to find something else to do.  
For Caleb (9) it's something else that triggers his attention
Both boys SOOOO different.

We as parents are training the next generation and it's our job to teach them that their 
consequences to their actions - good and bad, and it will affect the rest of their lives.  
I'm trying to teach my boys now to pray for wisdom in making the right decisions.  
They are going to face with decision throughout their lives and there will be times that
 I won't be there to make it for them.  I can't wait till their teenagers to 
start training, I have to start now.  I pray daily for God's wisdom and strategy in talking 
to my boys with the right words so that they understand
 because if I relied on myself things just don't go smooth.

I wasn't expecting this to be a very long blog, but I wanted to paint a picture of how 
our kids really watch what we do.  
Let's be Godly examples to our kids and stay consistent!!!


Friday, January 13, 2012

Not making New Year resolutions, just making changes . . .

Two weeks into the new year . . . what changes have you made?

We made several and are excited about it. James and I sat down and wrote down our goals ( I'll share my goals since this is my blog)  

1st goal: Want to lose weight, I've been working out every morning. I want to feel better and have more energy.  I don't have a weight goal, my goal is one size down at a time.

So with that goal, food is my 2nd goal . . . my secret is that I LOVE, LOVE food . . . LOL and I've been blessed to have a husband who can cook.  
Here's another secret . . . . I don't like to cook.
BUT . . . I've taken on the challenge to put dinner together and I'm actually having fun.
I started with creating menus for the month of January. 
I found some great recipes from Pinterest (which is amazing and I love all the ideas that I'm getting from it) 

 Last night, I made Chicken Florentine Casserole which turned out really good

All the ingredients, minus the spinach (I forgot it in the fridge)

I browned the chicken before placing into the oven, 
but I think I'll leave it raw next time.  
The chicken was a little rubbery, but still taste good.

After browning the chicken, I saute the fresh mushrooms, onions and spinach, then place it on the bottom of the glass pan.  I had mix butter, half and half, mushroom soup and parmesan cheese in a pot and boiled it, then poured it over the spinach mixture.

Here it's kinda hard to see, but I place the chicken on top and covered it with bacon bits and mozzarella cheese and place it in the oven for about 20 minutes, 


Ok, so there's alot of gravy and that's how I like, but you can't really see the chicken.
I also made brown rice noodles (bow tie pasta for James and Caleb)
It was a hit!!! I was sooooooooo good ;)

Now I do have to say that this meal is NOT helpful for my #1 goal,
 but a girl can treat herself once in a while, Right?


I'd love to hear about any changes that you've implemented into your lives. And if you get to try this amazing dish, I've love to hear about it ;)

Have a wonderful weekend!


~Janelle